

Kubernetes Architecture
Kubernetes is a popular open-source container orchestration platform that automates the deployment, scaling, and management of containerized applications. The architecture of Kubernetes consists of the following components:
1.Master Node
2.Worker Node
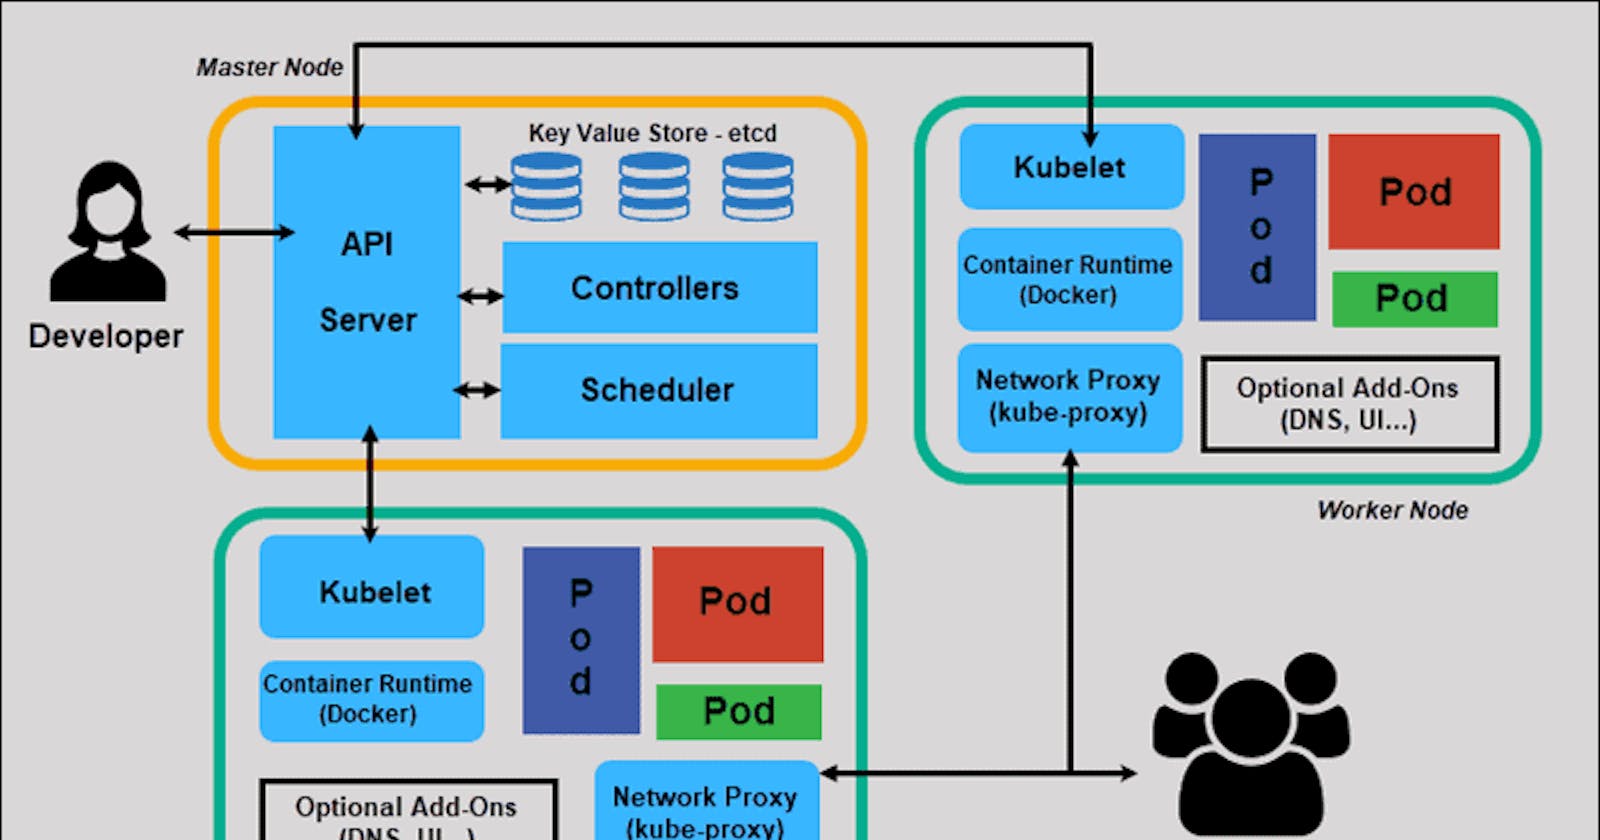
Master Node: The master node is the control plane of the Kubernetes cluster and is responsible for managing the cluster's state. It consists of several components, including the Kubernetes API server, etcd, the controller manager, and the scheduler.
Kubernetes API Server: The API server is the primary control plane component that exposes the Kubernetes API. It acts as a gateway for managing the Kubernetes objects such as pods, services, and replication controllers.
etcd: etcd is a distributed key-value store that stores the configuration and state of the cluster. It provides a reliable and consistent way of storing data across the cluster.
Controller Manager: The controller manager runs various controllers that are responsible for managing different aspects of the cluster, such as the replication controller, endpoint controller, and service account controller.
Scheduler: The scheduler is responsible for scheduling pods to run on worker nodes based on resource availability, constraints, and other policies.
Worker Nodes: Worker nodes are the machines that run containerized applications. They communicate with the master node to receive instructions on what containers to run and how to manage them. Each worker node runs a container runtime such as Docker or CRI-O.
Kubelet: Kubelet is an agent that runs on each worker node and is responsible for managing the state of the node, including starting, stopping, and monitoring containers based on the instructions provided by the Kubernetes API server. It communicates with the master node to receive instructions for running containers and reports the status of the containers back to the master node.
Container Runtime: A container runtime, such as Docker, is responsible for running the container images that make up the application workloads. It provides an isolated environment for the containers to run, manages the storage and network resources of the containers, and provides an interface for the kubelet to interact with the containers.
Kube-proxy: Kube-proxy is a network proxy that runs on each worker node and is responsible for routing traffic between services and pods. It maintains network rules on the worker node to enable communication between pods and services.
Pod: A pod is the smallest deployable unit in Kubernetes and represents one or more containers that are tightly coupled and share resources such as network and storage. Each pod runs on a worker node and can be created, scaled, and deleted by the Kubernetes API server.
Installing and Configuring Kubernetes
Please follow the below steps to configure the lab Master machine:
STEP 1: On Master Node Only:
Kindly execute the below commands to Configure Docker Daemon:
      sudo su –
      sudo wget https://raw.githubusercontent.com/lerndevops/labs/master/kubernetes/0-install/daemon.json -P /etc/docker
      sudo systemctl restart docker.service
      sudo service docker status
Initialize kubernetes Master Node by running the following command:
sudo kubeadm init
To fix the problem of "The connection to the server localhost:8080 was refused - did you specify the right host or port?", please run the below-mentioned commands:
sudo mkdir -p $HOME/.kube
sudo cp -i /etc/kubernetes/admin.conf $HOME/.kube/config
sudo chown (id -g) $HOME/.kube/config
Install networking driver -- Weave/flannel/canal/calico etc. by executing the following command:
sudo kubectl apply -f
https://raw.githubusercontent.com/projectcalico/calico/v3.24.1/manifests/calico.yaml
Validate using the command "kubectl get nodes" Step 2: ON ALL Worker Nodes
Configure Docker Daemon on all worker nodes by executing the below commands:
sudo su -
hostname WORKER1
sudo su -sudo wget https://raw.githubusercontent.com/lerndevops/labs/master/kubernetes/0-install/daemon.json -P /etc/docker
sudo systemctl restart docker.service
sudo service docker status
Run Below on Master Node to get join token and copy the kubeadm join token from master & run it on all nodes with the command
sudo kubeadm join <master-node-ip>:6443 --token mks3y2.v03tyyru0gy12mbt --discovery-token-ca-cert-hash sha256:3ee23d42c7002be0893339fbe558ee75e14399e345f22e3f0b34351077b7c4b45
Validate on master node using the commands "kubectl get nodes" and "kubectl get nodes -o wide"
If nodes are with status as NotReady, then delete the node and join it again in the cluster by executing the below steps:
On Master Node:
kubectl delete node nodename

kubectl get nodes
On the same Worker node that we have to delete:
kubeadm reset --force
On master Node: generate the token again, execute the below command:
sudo kubeadm token create --print-join-command
Copy the token
On Worker Node: Copy the token, the node will join the master node
On Master Node: kubectl get nodes
Summary
In this article, we explored the basics of Kubernetes architecture, installation, and configuration. We discussed how Kubernetes is designed to manage containerized applications and the components that make up a Kubernetes cluster, including the control plane and worker nodes. We also walked through the steps to set up and configure a basic Kubernetes cluster using kubeadm.